
This post contains affiliate links to products, services, or education. We may receive a commission for purchases made through links.
Welding copper to steel is a popular welding technique used in artistic sculptures and other applications, but not all welders know how to do it. It can be accomplished, but the resulting weld is difficult to pull off and often does not have very much structural integrity compared to other bi-metal welds.
So how do you weld steel to copper? The best option for welding steel to copper is actually a brazing technique since the melting points of steel, and silicon bronze (the required filler metal) are so disparate. You can use silicon bronze filler wire and a TIG welder to weld steel to copper most easily while maintaining as strong of a bond as possible between the two metals.
This welding technique requires a specific set of sequential processes in order for the weld to be both strong and good-looking. Read on to find out more about exactly how you can best weld steel to copper.
Keep reading to see a video of Mr. TIG Wyatt Swaim TIG braze a piece of copper to steel with ease!
Properties of Steel and Copper During Welding
Stainless steel is a popular metal in welding for many reasons—it’s very strong, it’s ductile, and it’s easy to weld, especially in comparison to many other kinds of metal. Steel is also highly anti-corrosive (hence the title “stainless”). On its own, stainless steel is not a problem to weld.
In comparison to stainless steel, copper is an ancient metal with both a high level of thermal conductivity and a high coefficient of thermal expansion to match, which means that this metal is prone to distortion and other defects under the welding torch.
The main metallurgical issue with welding steel and copper together is that their melting temperatures are so different. Copper melts at 1085 degrees Celsius, while stainless steel melts at roughly 1400 degrees Celsius in comparison.
That’s a temperature difference of over three hundred degrees between melting points, so when you’re trying to melt two metals together, you can see how that would be a bit of an issue. Stainless steel and copper aren’t fully soluble as a result of these different melting points, which means when they are integrated, copper melts into crystallized steel in such a way that the bond created is very weak and prone to cracking.
Why Use a TIG Welder for Welding Steel to Copper
There are several reasons that a TIG welder is the best possible option for welding steel to copper. Here are some of the advantages of using a TIG welder over a MIG or stick welder:
- TIG welders do not expose metal to high heat as long as MIG welders, which allows the metal to cool more quickly between welder pulses. Since steel to copper bonds are already weak, prolonged high heat exposure for the area surrounding the weld is the last thing you want, since this will cause the metal to become even more brittle and possibly crack.
- TIG welders are considered the most precise welders available and are the welders most suited for welding exotic combinations of metals, or metals with disparate melting points. While a copper to steel weld requires a filler metal, some TIG welds do not even require a filler metal.
- TIG welding is affordable. Despite the advantages it offers over MIG welding in general, such as a cleaner weld and more varieties of metal that it can work with, TIG welding is not that expensive. It uses a non-consumable tungsten that does not have to be replaced often, and while TIG welders were very expensive when they first came out, they have come down in price.
A TIG welder is hands-down the best tool you can use to try and weld steel to copper. Besides that, it’s arguably the best welder you can have for any application due to its versatility and powerful, precise welding capability.
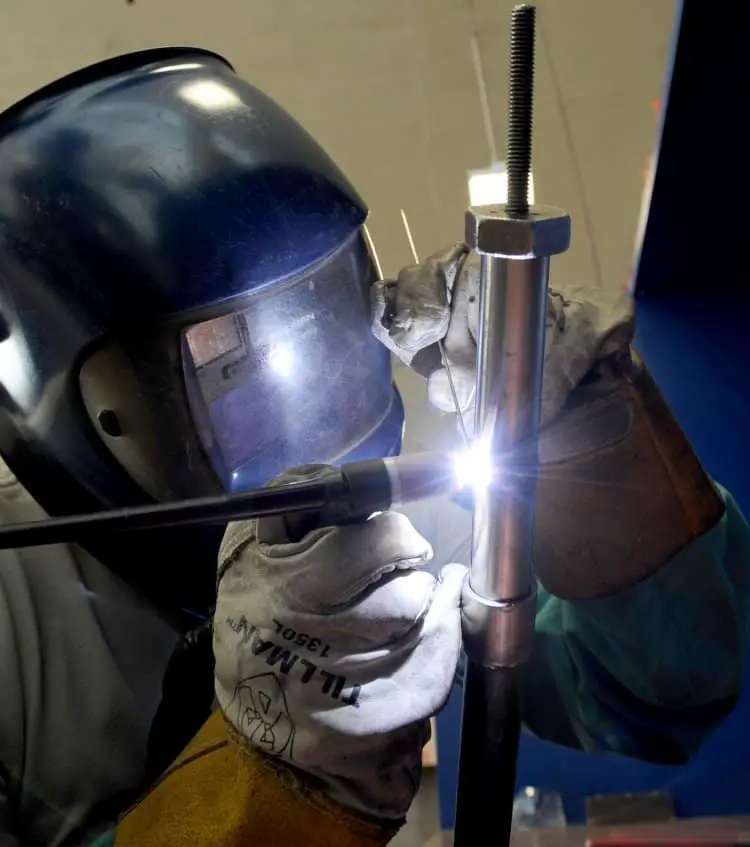
Here is Wyatt Swaim brazing with a TIG welder in the same fashion we will describe below.
Why Using a TIG Welder for Welding Steel to Copper Can Be Difficult
While using a TIG welder is the best option for welding steel to copper, that doesn’t mean that it’s an easy process, Because of the properties of a steel to copper weld and the technicality of running a TIG welder, performing a steel to copper weld can be a complex operation.
Here are some of the drawbacks for using a TIG welder to weld steel to copper:
- TIG welders can be difficult to use. Because you have to simultaneously run the welder, control the gas shield pedal, and often move a filler rod at the same time while TIG welding, it can be difficult to get the hang of managing all three of these tasks at once with smooth efficiency.
- Steel and copper do not bond well. Welds with these two materials are prone to heat-cracking and other defects during the welding process.
- Once two objects have been welded together with a TIG torch, they often cannot be separated without destroying both objects due to the type of fusion that a TIG torch creates. It can be done and is often performed by professional welders, but it is not the desired outcome of a welding operation. This means that once a steel and copper object have been welded together, they usually can’t or shouldn’t be recycled in other metalworking operations.
- Materials welded by TIG welders must be clean. If the steel and copper you’re trying to weld aren’t clean, contaminants can potentially make the bond between the two metals too weak to be of feasible use or cause unsightly discoloration around the site of the weld.
- TIG mistakes are costly. TIG torches are hard to weld with, steel and copper are hard to weld together, and this can lead to a lot of warped, defective, or wasted materials in attempts to get a decent TIG weld for inexperienced welders. And if you accidentally dip your tungsten in the weld pool, you can potentially destroy it (or at the very least will have to re-sharpen it).
Assembling a TIG Welder for Welding Steel to Copper
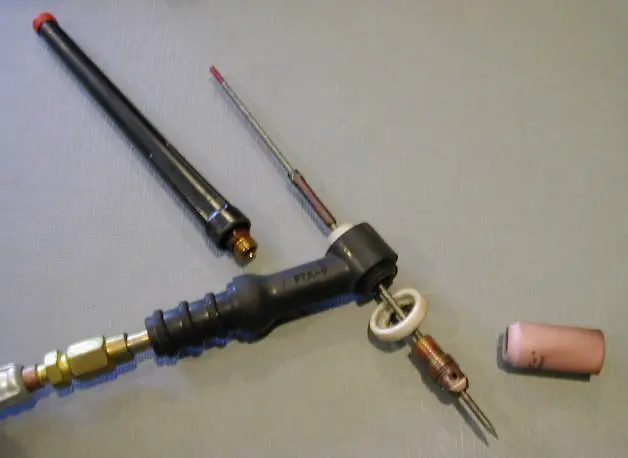
Before you do anything else, you’re going to need to assemble your TIG welding torch to begin the welding operation. Here is how you assemble the TIG welding torch for welding steel to copper:
- Seat the tungsten in the collet. It’s important at this point not to twist the tungsten on too tightly or stirp out the copper alloy threads in the welding torch, which are delicate. The gentler you are with your welding tools, the longer they’re last.
- Take the back cap and put it on. Like on the front of the TIG welding torch, the rear of the torch will also have fine copper alloy threads, so do not twist the back cap on too sharply. Don’t bother tightening with pliers or any other tightening tools, hand tightening is more suitable.
- Lock the back cap in with the collet. Both the back cap and the collet should be seated firmly on either end of the TIG torch.
- Install the welding cup on the front of the welder. Thread this component onto the front end of the welding torch until it sits snugly inside the insulator.
Once you’ve completed this last step, the TIG torch is fully assembled and can be used to begin the steel to copper welding operation.
Setting Up the TIG Gas Shield for a Steel to Copper Weld
When you have your TIG torch assembled and ready to go for your steel to copper weld operation, the next step is to set up your gas shield. The gas shield on the TIG torch is what contains the weld pool and prevents discoloration of the surrounding metal and contamination of the weld. Because copper is prone to distortion under high heat, shielding it properly during a welding operation is important.
Here are the steps necessary to get your TIG torch’s gas shield set up for a steel to copper weld:
- Slowly turn the gas on the TIG torch on to avoid cracking the tubing of the flowmeter gauge with the ball on its interior.
- Set the air flow for the inert gas source between fifteen and twenty cubic feet per hour. You can adjust this setting as necessary once you get a feel for how much shielding you have.
- Adjust the torch to 125 DC amps.
- Check the pedal of the TIG torch to make sure that it is functioning correctly.
Once you have your TIG torch’s gas shield set up, here’s how you use the gas shield while performing your steel to copper weld:
- Be sure to provide at least seven to eight seconds of inert gas post-flow when you’re finished welding. This measure is to help prevent the tungsten on your TIG torch from oxidizing while it cools down.
- Leave a few seconds of post-flow over the material after the welding arc is out to make sure that the weld pool is protected from contamination until it has a chance to cool.
What Kind of Tungsten to Use in a TIG Welder for Welding Steel to Copper?
When you’re planning on doing steel to copper welding operation, a good tungsten to use is 3/32” tungsten sharpened to a thirty-degree point. Sharpened tungsten is what gives you the most reliable arc strikes along with a low burn-off point. This way, your tungsten electrodes will last longer.
Since tungsten is a rare metal and relatively expensive to keep stocked in the workshop, a major advantage of it is that it is non-consumable and lasts for a long time, provided it is maintained well (and kept out of the weld pool).
How to Hold a TIG Welder when Welding Steel to Copper
Whenever you weld steel to copper with a TIG torch, you need to keep in mind that when you’re moving the tungsten through the weld pool, you should be aiming for a pushing motion with the welder rather than pulling it along.
If you drag the tungsten through the weld pool rather than pushing it along the forward edge, it leaves the weld vulnerable to the Venturi effect. This metallurgical reaction increases the porosity of the weld and decreases the strength of its bond. This not only leads to ugly-looking steel to copper weld, but it also makes the weld a lot less stable.
Rather than dragging the tungsten end of the TIG torch through the weld pool, you should try to keep the torch pushed forward at a slight angle of ten to fifteen degrees vertical. For righthanded metalworkers, pushing should be done from right to left, while lefties should do the opposite and push from left to right.
To initiate the arc on the TIG torch, take your foot and smoothly compress the pedal all the way down. Depending on the TIG torch, you may need to perform a tap or scratch start to initiate the welding arc, but on a lot of modern models, you don’t have to.
Tips for a Successful Steel to Copper Weld with a TIG Torch
There are a few things you can work on as a welder when doing steel to copper welds so that they come out more successful, and most of these tips involve the operation of the torch itself. Here are some ways you can increase the quality of your TIG welds when using metals like steel and copper:
- Keep your torch travel speed consistent. Bead width of the weld is determined by how quickly you travel the tip of the welding torch, and it’s important that you travel the torch smoothly as you weld. Otherwise, you’re going to end up with a weld that looks haphazard and not very clean.
- Be careful about moving quickly. When you travel your TIG torch quickly, this leads to a narrower bead. Moving too fast can decrease the weld’s structural integrity because there is not enough filler spread along the seam. This can lead to the weld seam failing completely later down the road as its weak points become weaker with age or stress under load.
- Be careful moving of too slowly too. If you move the TIG torch too slowly across the surface of the weld, this increases the size of the heat-affected area around the weld bead itself. Not only does this lead to unsightly discoloring and visual defects, it also contributes to brittle metal and porosity problems.
When it comes to TIG torches and using them to try and weld steel to copper, it’s a case of Goldilocks—you need the TIG torch to move at a consistent speed that isn’t too fast and isn’t too slow. It’s difficult to tell someone how to properly gauge the speed for a consistent weld, so the best thing to do is to practice beads over and over until you get a sense of the TIG torch’s most efficient speed.
If you’re used to other types of welding, TIG torches can seem to be a hassle in comparison, but their versatility and the very high quality of the welds they can produce make the extra trouble to learn how to handle them properly worth the effort. Once you’ve mastered the TIG torch welding disparate metals like steel and copper, you have the basic welding skill set to take on pretty much any weld at that point.
The more often you use your TIG torch, the more comfortable you’ll be with it, and the more consistent welds you’ll be able to produce over time, even when dealing with difficult metals like steel and copper combinations.
TIG Welding Problems and How to Solve Them
Tig welders are difficult enough to learn how to operate efficiently on their own without throwing in the problems involved with trying to melt copper and steel together. Besides the difficulties of getting a good weld with those metals, there are many other common problems that people who are inexperienced with TIG welders run into when first learning how to run them.
Here are some of the problems that welders run into with TIG torches, and how to fix them:
Problem: The welding arc is too long. This causes the weld pool to not be directly under the tungsten tip of the welding torch, which greatly increases the risk of oxidation and atmospheric contamination due to a lack of protection from the gas shield. The result is a weld with ugly hazing effects on the surface of the metal and a brittle, porous bond.
Fix: To avoid a welding arc that is too long, be sure to keep the tungsten tip of the welding torch no further than an eighth of an inch from the base metal’s surface. The tip of the torch should not deviate from this distance for the duration of the weld to get the best results.
Problem: The welder puts too much angle on the torch during operation. If the welder holds the TIG welding torch at too sharp of a vertical angle, this causes a problem with oxidation and can even cause the welding cup to drag into the weld seam itself. This both decreases the consistency of the torch’s travel speed and also the consistency of the weld itself.
Fix: To make sure you have a good angle on your TIG torch while making steel to copper weld, keep the torch held consistently at ten to fifteen degrees vertical to the base metal’s surface. This is the best angle to run a TIG torch for practically any welding operation.
Problem: The tungsten accidentally got dipped into the weld pool directly or came into direct contact with the filler wire. If you dip the tungsten of your welding torch into the weld pool, this will contaminate the tungsten even if you didn’t leave it in the weld pool or filler long enough to damage it.
Fix: Unfortunately, the only way to solve this problem is to stop the welding operation temporarily to re-sharpen and clean your tungsten carefully before continuing the weld. If you continue to perform the weld with dirty tungsten, it can potentially cause major quality problems with the final result.
For the most part, these common problems with TIG operation can be avoided by both consistently practicing your TIG welding until you are quick and comfortable with it, and also by making sure you don’t get careless or sloppy while operating the welder.
How to Add Filler Wire when TIG Welding Steel to Copper
When you’re using a TIG welder to weld steel to copper, you’re going to want to use silicon bronze rod as your filler metal to join the steel and copper since it’s the only way to get two metals with such differing melting points to bond with each other.
Since the melting points of steel and silicon bronze are still quite different, this technique is more of a brazing operation than a true weld. This means that the silicon bronze acts as an adhesive metal between the steel and copper, rather than completely fusing the two.
Learning how to run a filler rod properly with a TIG torch is just as important as learning how to operate the torch itself. Read the process below to learn the best methods for adding silicon bronze filler wire to your steel-to-copper weld:
- Be sure to keep your filler wire on the weld pool’s leading edge, rather than sticking it in the middle or on the rear. Each time the filler rod contacts the weld pool, it leaves a rounded weld mark. This process is colloquially called “stacking dimes,” and to create an aesthetically pleasing weld, these marks should be sized and spaced consistently along the weld seam.
- Do not melt the filler rod with the arc above the weld pool and let it drip onto the metal base. If you do this, you’re not just dramatically reducing your overall control over the welding operation, but you’re also much more likely to get splatters and drips of metal along the edges of the welding seam, which looks unprofessional and wastes filler rod.
- Use a tacking technique to stabilize the weld. If you need to link a piece of steel and a piece of copper quickly in order to keep them steady for a longer weld seam, try using “tacks”—these are little bits of filler rod welded into the corners of the weld joint to hold them together and increase the stability of the work piece for the rest of the weld.
- Drag the filler wire in the weld pool. While there are some welding styles that require you to dab the filler rod into the weld puddle’s front side, for doing a weld on steel and copper you need to use a “lay wire” method instead where you constantly leave the filler rod at the far forward edge of the weld pool.
- Try not to melt the base metal too much. Not only is this prone to causing discoloration and marred effects around the weld seam, it also makes the surrounding heat-affected metal more brittle and porous, reducing the structural integrity of the weld site. You’ll want to focus your torch on the filler rod rather than pushing it down into the base.
- If your TIG welder has a pulse functionality, take advantage of it for increased precision and a higher quality result. Not all TIG welders come with a pulse function, but if you have one, it can be a valuable tool for maintaining a high level of control over the welding operation. A good rate of pulse is two pulses per second, but you can adjust according to personal preference.
- Make sure you use enough filler wire. The amount of filler wire you are pushing into the weld pool as you travel the TIG torch should be equivalent to the relative diameter of the wire, so if you’re using a 1/8th inch silicon bronze filler road, you’ll want to push approximately an eighth of an inch of filler rod into the weld pool as you go along. Use too much and the weld will look bulky, don’t’ use enough, and the TIG torch could burn through the silicon bronze into the base.
Because the filler rod is ultimately going to determine the final “look” of your weld, it is important that you be careful and make sure that you are adding your filler rod consistently while also traveling your TIG torch consistently behind it.
Consistency is the key word we’re looking for here. You don’t need to move fast, and you don’t need to move particularly slow, but you do need to be smooth and calm in your welding actions for a clean-looking result.
TIG Welding Can Be a Great Option for Steel to Copper Welding
Welding steel to copper can be one of the more difficult common welding processes performed by both amateur and professional welders, but if you have a TIG torch at your disposal, a TIG torch can take a lot of the hassle out of performing this kind of weld.
The biggest challenges for TIG steel to copper welding operations are the metallurgical properties of the two metals themselves as well as the steep learning curve involved with figuring out how to operate a TIG welder effectively.
Once you’ve mastered those two aspects of the steel to copper welding operation, however, you can take a TIG welder to just about anything.
Credits:
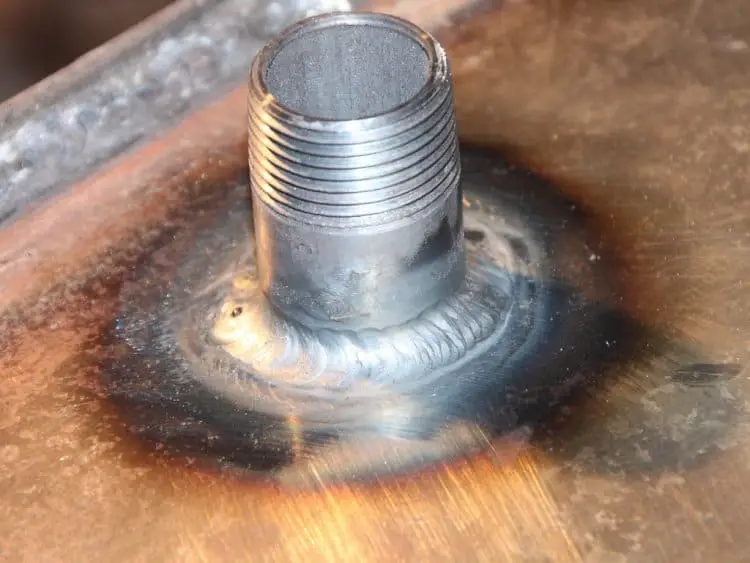
Steel bolt TIG welded to copper (first image above) via Flickr
