This post contains affiliate links to products, services, or education. We may receive a commission for purchases made through links.
You made the weld, and the bead looks pretty good. Then you notice it. That slight distortion in the steel you just welded. As the metal cools, the bend gets worse, and before your eyes, that nice neat piece of work becomes a bent, twisted out of shape thing. Now what?
Straightening steel after welding can be a frustrating job. Understanding a few simple tricks can help you minimize the frustration and save your work without having to start from scratch.
How to straighten steel after welding? To reshape steel that has suffered distortion during the welding process, welders use one of the following methods.
- Heat Straightening
- Hot Mechanical Straightening
- Hot Working
- Mechanical Straightening
The simple act of heating metal during the welding process causes stresses within the steel that often lead to distortion or bending. Understanding how the metal reacts to these stresses and applying a few simple tricks during the welding process can minimize distortion and bending, making your welding process much faster and more efficient.
Straightening the Bends
Even professional fabricators suffer distortions and bends in their metal. Over the years, many processes and devices have been devised to remedy these unforeseen problems. Some of these solutions have stood the test of time and have become standard practice in the industry.
Unfortunately, some of these solutions require special equipment or expertise to be effective. There are few remedies available to the home hobby metal worker that can be effective.
Heat Straightening
Heat straightening is nothing more than applying more heat to the distorted part and allowing the natural action of the heating and cooling to bring the deformation back into a more natural position. There are downsides to this process.
To accomplish heat straightening, you must apply controlled heat to the proper places on the metal gradually to allow the metal to expand and shrink. Careful observation of the effects of the heating will allow you to make adjustments to the location and the amount of heat applied to further the process.
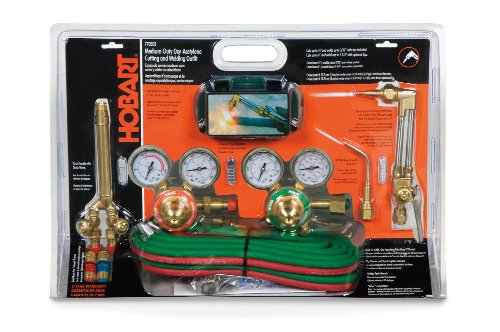
An oxyacetylene torch is the usual tool to perform the heat straightening. If you are going to try using an oxyacetylene torch to straighten the metal, take care, and avoid raising the temperature of the metal past the point where molecular changes begin to occur.

You must also remember that you are not heating the metal to reshape it. The idea is to heat the metal and then allow it to cool. The natural internal stresses that this heating and cooling, when properly applied, can return the metal to its original non-distorted shape.
Heat straightening is not a symmetrical process, nor is will it ever return a welded piece of metal to its original shape. About the best you can hope for is to move the metal to a less distorted shape without compromising its strength or structural integrity.
Hot Mechanical Straightening
Hot mechanical straightening employs the same techniques as heat straightening with one big difference. When performing hot mechanical straightening, heat the metal to the yield stress point. The yield stress point is defined as the stress at which a material begins to deform plastically.
Heating to this temperature pushes the metal past the yield stress point and allows you to straighten the metal. You can make changes to the metal quickly. It is possible to recover severe distortions in your metal using hot mechanical straightening but not without some problems.
Unpredictable results often accompany hot mechanical straightening. Metal and welds can fracture. The properties of the metals welded can change, leading to strange behaviors in the metal or the welds. More wrinkles and buckles may appear, and other deformations may appear as the metal cools. Pushing the metal past the yield stress point can cause internal changes in the structure of the metal. These changes may not be visible on the surface.
For these reasons, always use extreme care when trying using hot mechanical straightening techniques on your work.
Hot Working
The next step beyond hot mechanical straightening is hot working the metal. Hot-working is like hot mechanical straightening. The difference is the degree of heat you apply to the metal. During hot working, you would heat the metal past the point at which molecular changes in the metal may begin to occur. Usually, the metal will begin to glow a cherry red at the proper temperature.
At this point, you can move the metal into the desired position. However, there is no guarantee that the metal will retain this position. Changes in the molecular structure in the metal can impart additional and different stresses in the metal, causing other problems as well as additional distortions. The metal and the weld may also become brittle and develop cracks.
Mechanical Straightening
Mechanical straightening is probably the most used method of dealing with welding distortion in your metal. One of the main reasons for the popularity of mechanical straightening among home and hobby metal workers lies in the simplicity of most of the methods. Many of the simple tools needed to perform mechanical straightening are already available in most home and hobby shops.

Presses are used in many instances to remove dents and distortions from sheet metal. Hand screws are easy to source and simple to use. Hydraulic presses make the process even easier. Many smaller hand-operated hydraulic press tools are available in and around small shops. Many of these tools are economical enough to be purchased by the home hobby welder for use in their shops.
Another option for the home hobby metal worker is fastening devices. These can be as simple as a vice or as complex as a special welding jig fabricated for a single job. The concept of using fastening devices to pre-position the metal to be welded helps prevent distortion to the metal you are welding.
A wide variety of other tools are found in the shop and are often used to relieve or repair distortion in the welded metal. Tongs, clamps, and even hammers and mallets are viable alternatives. Most of us are well versed in the use of a hammer to bring a bent piece of metal back into the proper position.
Pipe Straightening
Some specialized forms of straightening deserve mention. One such method is pipe straightening. Welding pipe can cause the pipe to deform in strange ways because of the curved surfaces on which the stresses act during the heating and cooling process.
Many fabricators will fill the pipe with fine-grained dry sand and close the ends of the pipe. The pipe is then heated and straightened. The fine-grained sand packed into the pipe prevents further deformations from forming. Use caution when doing this type of straightening. Applying to much heat to a closed pipe can be dangerous.
Understanding Distortion in Metal
The nature of welding is the primary cause of distortion or bending during the welding process. Welding needs high temperatures localized in a very small area to allow the metal to fuse. It is this localized heating and cooling that distorts the metal parts as you weld.
Localized heating causes stresses within the metal. As the metal heats, it wants to expand and as it cools it contracts. Doing this at a small localized spot on a larger piece of metal causes internal stress. This internal stress doesn’t act equally in all directions in the metal. The results are bends and distortions in the metal.
Here is a great video that explains the basic principles of distortion.
Expansion and Contraction
These distortions because the expanding localized area that is heated wants to expand. As this area of the metal expands, it meets the colder metal further away from the area of the weld. The colder metal restricts the movement of the heated metal. The restriction creates an area of stress in the metal and distortion results.
As the heated area cools, it wants to contract, pulling on the areas of unheated metal. This cooling and contraction create more stress. Further distortion is usually the result.
The science behind the ways that metal reacts to heating and cooling during the welding process are well studied and well documented. For a more in-depth discussion of the science behind internal stress in metal and the distortion that results is available at Welding Advisers.
The Factors Involved in Distortion
All metal undergoes these stresses as it is heated and welded. Sometimes the distortions and bends in the metal are so minute as to be invisible to the naked eye. Other times, these internal stresses result in those nasty warped workpieces that welders fear.
The type of metal you are welding, as well as the form of the metal, is a consideration as well. Different metals, even different alloys of the same metal, will react differently to the heating and cooling caused by welding.
- When welding different alloys, you should take great care to consider how each of the alloyed metal will react to the heating and cooling effects and the stresses that will accumulate in the metal. Alloys of aluminum stress differently due, mostly, to the structural differences caused by the alloying metals.
- The thickness of the metal affects the way stresses accumulate. The thinner metal reacts much differently than thicker structural metal. Welding different thicknesses of metal can cause unpredictable results. The different thickness of metal will heat and cool and different rates. The thicker piece of metal will often pull the thinner piece of metal out of shape more rapidly, causing excessive distortion.
Stress in metal, and the distortions it produces, is a well documented and studies science. Serious metal workers and welders especially need an understanding of the principles of stress and distortion. Many websites document these studies and their findings. Many contain charts and diagrams used industry-wide to help predict possible distortion during welding as well as to plan welding projects to minimize distortion.
As with most things in the modern age, welding has entered the computer age. Computer software that can predict stresses and aid in simulating the assembly and welding process is now on the market.
Distortion Comes in Many Forms
Welders, especially hobby welders, set themselves up for problems before they run their first weld on their project. These problems occur when the welder doesn’t understand the metal and the stresses that occur. Warps and distortions don’t just happen haphazardly. These distortions can be easily classified. Knowing what to look for in your metal and how it will react to heating will help reduce bends and distortions during welding.
For a more in-depth and exhaustive discussion of weld distortion, Lincoln Electric provides excellent information.
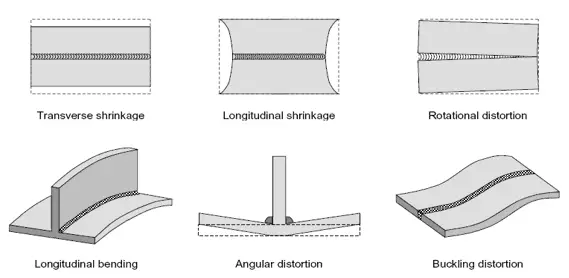
Longitudinal Shrinkage
Longitudinal shrinkage is a change in the size of the metal along the axis of the weld, causing the material to shrink or contract along the dimension of the weld. The usual result of this type of shrinkage is a bowing of the material.
This type of distortion often occurs when doing long butt joint welds on sheet material. The material heats along the two edges of the weld and expands. When the material cools, and contracts, the dimension along the weld shortens in relation to the outside edges of the weld resulting in a bowing of the material.
Transverse Shrinkage
Transverse shrinkage occurs across or transverse to the weld axis. When this type of shrinkage occurs, the welded metal may change dimensions across the weld. Transverse shrinkage can cause the final dimension of the workpiece to change during the welding process resulting in a project that may not have the actual design dimensions upon completion.
Angular Distortion
Angular Distortion usually occurs when making butt, lap, or corner joints. The result of angular distortion causes one of the workpieces to bow upwards. Ths bowing leaves one of the pieces of metal concaved or convex along the axis of the weld. This type of distortion is particularly problematic if you are trying to create T-joints and need to produce flat right angles
T-joints are particularly susceptible to angular distortion. As you weld long the axis of the weld, the flat plate will tend to bow upwards toward the upright portion of the welded part, imparting a slight bow to the bottom flat plate of the T-joint.
The cupping or bowing occurs when the flat plate expands and contracts while the lower side away from the weld remains cooler. The internal stresses on the top side of the plate pull the outside edges of the bottom plate upwards toward the weld creating a dish shape in the welded piece.
Bowing and Dishing
When welding on the perimeter of plates or sheets of metal, the center of the sheet or plate often develops a bow or dish. The bowing or dishing is caused by the uneven heating of the sheet or plate as you weld along the perimeter of the material.
The enter portion of the material never heats, and as the perimeter is heated and cooled, it expands and shrinks but never in the same proportions, leaving a bow or dip in the center of the plate or sheet of material.
Buckling and Twisting
Buckling and twisting in welded metals is a combination of two or more of the stress distortions listed above. The combination of the stress distortions on the metal will cause movement in several directions causing the buckling and twisting.
Predicting how distortion will occur when welding complex shapes is hard, especially when joining dissimilar materials or materials of different thicknesses. Many times the best means of dealing with problems of distortion when welding complex projects is to employ jigs or fixtures that hold the various pieces rigidly in place.
Minimizing Distortion Before the First Weld
Controlling distortion in your welding project begins before you make the first weld. Understanding how heat affects the metal and how it may react to the welding process can give you an idea of how to approach the welding process on your project to minimize the effects of distorting and bending.
With that understanding of how the metal reacts to the heating and cooling process involved in welding, you can begin to plan your work to minimize the effects of the internal stresses that welding imparts to the metal.
Preplanning your welding process can make a huge difference in the amount of distortion that you see in the metal. When you plan your welding process, consider some of these ideas to help minimize the distortion and bending in your project.
Don’t Over Weld
Placing to much metal in the weld is a quick way to increase the stresses in the metal, which leads to distortion and bending. Contrary to popular belief, a thick, heavily concaved welding bead is not stronger. The extra metal in the bead can increase the stresses that lead to distortion along the axis of the weld.
Making a flat or only slightly convex bead is more economical and reduces the chances of stress-induced distortion along the weld. Proper welding techniques are one of the best ways to prevent distortion during the welding process.
Take a Break
Not from welding on your project, but from welding on a single joint. Intermittent welding reduces the heat build-up at the point of the weld. Continuous welding in long beads heats the metal without allowing time for cooling. This process induces more stress along the weld than running short beads. Take a break from running long continuous beads and give the metal time to cool.
Make Fewer Passes
Stress in metal from heating and cooling tends to be cumulative. The net effect is that several welding passes with smaller electrodes causes more stress than one or two passes with a heavier electrode. Understanding how to size your electrode and the best settings on your welder for the material you are working will result in less stress and less distortion.
Place Your Welds Strategically
Plan your work strategically to use the effects of heating and cooling on your work to effectively neutralize the distortions in the metal. Armed with an understanding of how the heating and cooling processes induce the stress in the metal. Strategically planning when and where to make welds will use the reaction of the metal to balance or offset these distortions as you weld. Let the metal work for you instead of against you.
Balance Your Welds
Every piece of metal has what is known as a neutral axis. The neutral axis is defined as the plane of the material, usually along its geometric center, where it experiences no natural tensive or compressive forces. In short, each piece of metal has a line where it will exhibit less tendency to distort or bend when heated and colled. Placing your welds as close to the neutral axis as possible will minimize the distortion of the welding process imparts.
Alternate Your Welding
Part of the strategic planning process should be a plan to weld in alternate places on your project. Working around the project allows the metal to cool and shrink as you work. Carefully observing where the metal is reacting during the welding process allows you to offset and correct some distortion and bending as you weld.
Clamp It
Clamping parts in place during the welding process will not eliminate distortion and bending, but it may minimize the effects. Using clamps, strongbacks, and other methods of holding parts in place can keep the metal from moving during the welding process and holding it in the proper position as the metal cools and stresses are acting on the material. When you remove the clamps, the metal may still distort to a certain extent.
Many fabricators call this method of reducing distortion fixturing. The idea is to build a jig or fixture that so tightly holds the pieces that distortion doesn’t appear. The net result is a welded piece that remains straight but is highly stressed internally.
These high levels of internal stress can lead to cracking, weld deformation, and eventual metal fatigue at the point of the weld.
Pre-Heating
Pre-heating the materials to be welded minimizes the temperature differences between the metals to be welded and the arc that produces the heat to make the weld. The less the temperature difference, the less the stresses that occur in the metal to be welded, thus limiting the distortion that can occur.
preheating the metal to be welded minimizes the expansion and contraction that occurs due to the heating and cooling. The preheated area, in turn, minimizes the stresses that occur, and that results in less distortion and bending.
Preheating is usually accomplished using a torch of some kind to gently and slowly heat the area to which the weld is applied. Several things happen during pre-heating, which have a positive effect on your welds.
The preheating normalizes the stresses inside to the metal. This normalization helps prevent stress-induced distortion as well as lessening the risk of cracking.
Proper preheating keeps the metal hotter during the welding process. Maintaining the heat in the metal reduces the hardness of the metal and can prevent a brittle weld prone to cracking.
When the metal remains hotter during the weld, it allows hydrogen to escape from the weld puddle. As the hydrogen escapes, the weld hardens more and prevents cracking.
Lastly, preheating reduces the amount of heat necessary for proper penetration in the weld area. Reducing the amount of heat necessary during the welding process is especially helpful in thick materials and on material that conducts heat quickly. Preheating allows much less heat during the actual weld, which lessens the induced stress and distortion.
Take Heart
No matter how well you plan and how well you work, there will always be some distortion or bending in your project. If you are lucky, it will be so minimal that you cannot see it. If you still experience distortion and bending on your work, there are ways to repair or mitigate these problems.
Minimize and Mitigate
For the home hobby metal worker, the steps to straightening distorted metal after welding start before the first weld. Knowledge of how the metal reacts to heat and the best practices for planning the welding process can minimize the amount of distortion that appears in the project. By minimizing the distortion, the time and effort needed to deal with the distortion are less.
When deciding how to deal with distortions that do appear in your project, remember to start with the method that involves the least heat. If those don’t work, move on to the more involved means of dealing with the distortions and bends.
These few simple steps in planning your work and in dealing with the distortion can make your welding much less frustrating.
- Don’t over weld.
- Take your time and don’t overheat the metal
- Make fewer passes to create the weld
- Plan your welds to offset the stresses that cause distortion
- Clamp or jig your project to hold the workpieces firmly.
- Consider preheating the metal to minimize stress.
To deal with the distortions and bends that may still occur, use the methods we have discussed.
- Heat Straighten the distortions.
- Try hot mechanical straightening.
- Employ hot working the metal if required.
- Mechanical straightening may work in conjunction with the other methods.
Sources
https://careertrend.com/how-7875006-do-remove-broken-screw-extractors.html
https://www.lincolnelectric.com/en-us/support/welding-how-to/Pages/weld-distortion-detail.aspx
https://www.twi-global.com/technical-knowledge/job-knowledge/distortion-types-and-causes-033
http://inbound.cammmetals.com/blog/14-tips-to-minimize-welding-distortion
http://www.airproducts.com/~/media/Files/PDF/industries/metals/metals-fabrication/metals-fabrication-how-to-prevent-control-welding-distortion.pdf
